update 05/05/2016: I’ve done some important changes over the next post. Like switching desvtack to packstack. Anyway, you are invited to check out both and create your own opinion. Also, I’ve changed jumpbox from ubuntu to Centos 7. I will update on the next posts some of my notes here.
Next posts will take you to a step-by-step guide to create you on-premises Proof of Concept of Nuage 3.2R6 and OpenStack Liberty. I’m considering installing this demo in just one server.
Next picture shows you the components I’m considering for this demo:
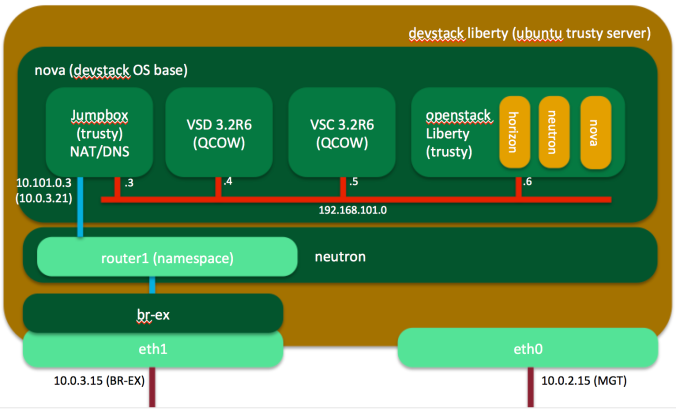
This will help you to understand how Nuage works with OpenStack. You will be able to try different use cases like: forwarding policies (chaining), ACLs, Manage L3/L2 Domains, Create a LBaaS based on haproxy, etc…
Minimal Capacity Requirements
In order to try some of the mentioned use cases, we need a minimal capacity requirements:
1.- VSD requires at least 8G memory and 100G disk for a demo (24G is the required on production). 3 instances is needed for High Availability. I’ve tried 4G into my laptop. However, services takes a long time of your life to set-up.
2.- VSC requires 4GB of memory (You need at least x2 on production)
3.- Jumpbox requires a minimal of 2G of memory
4.- OpenStack controller and computes depends on what do you want to do. Controller Nodes can fit in 4GB memory perfectly. Computes depends on how many memory you will provide to your instances. My case I will consider 5GB to have a minimal o 3 instances to play around.
Now, If we consider to install everything in one just server using devstack. And we add 4GB to support QEMU and a few of the projects (neutron, nova, keystone, glance). We do need at least 27GB memory in just one server. Let’s make it 32GB (just in case you’ve motivated to install also a VRS-G or an additional compute node)
Creating Base Image with DevStack
Ok guys, we need to create our small private stack to build our demo. At first I was thinking just to use KVM, but what the hell! Let’s do it with DevStack.
My suggestion is to run this OS base for DevStack in a physical server with al least 32 GB of memory, 4CPUs, 2 NICs and 300GB of Disk. Otherwise, you can download my Virtualbox ubuntu image that contains my DevStack downloaded and ready to install via ./stack.sh.
We’ll go thru the process to install DevStack in a server. Most of the info I’ll show you is on a VirtualBox’s venture. However, you can use the same procedure to implement that on your own. Actually I buying a fanless box in CappuccinoPC and disks/memory from Amazon (I’ve got this configuration from Jerrod). You can also see Diego’s option.
Meantime I’ll follow next with my VBox configuration.
Creating you demo in VirtualBox
VBox: Preparing interfaces
I have to define two network adapters based on NAT in my case (I am running this on my laptop and I need to take it with me over my trips, ok?). If your server will stay connected to your home network, you would better define both as bridged. Reserve a pool of bunch of IP addresses out of your DHCP’s one. Four IPs would be enough.
Then, you will have to define forwarding rules to connect to your VM as the following picture
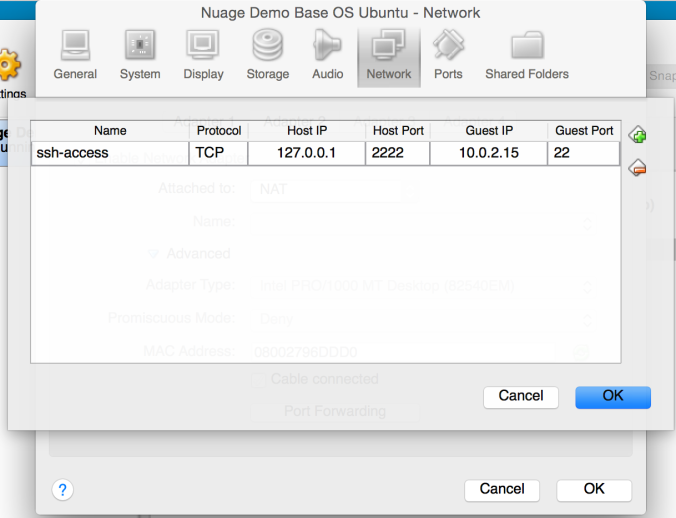
And connect your instance doing a something such as “ssh -l ubuntu -p 2222 127.0.0.1”
The second Interface It would be nice to create ssh access to your jumbox at 2223:
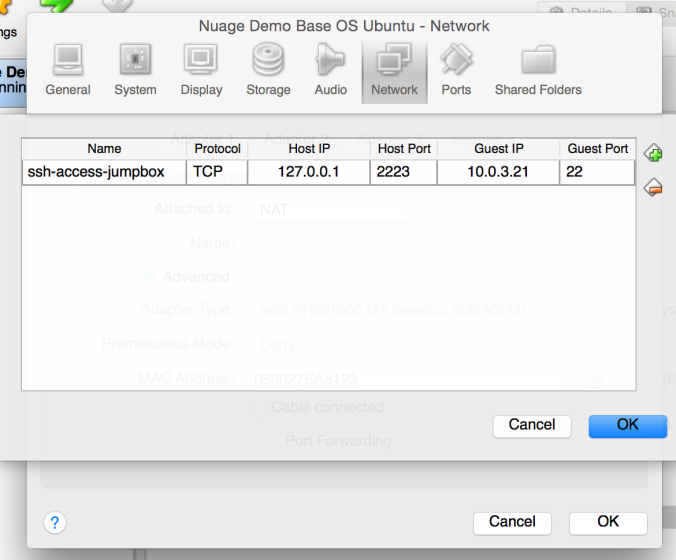
After you created your jumbox server you will be able to connect via “ssh -l ubuntu -p 2223 127.0.0.1″. Don’t forget to add your public-key among others into authorized_keys at jumbox server.
VBox: Creating and preparing your server
I am using VirtualBox 4.2.34 and I am using ubuntu-14.04-server-amd64.ova and download it from http://virtualboxes.org/images/ubuntu-server/ to my laptop. BTW, It’s a Mac with a 16GB RAM ☺.
I’ve changed the memory configuration of the OVA to 12GB memory and 4 CPUs. Remove useless things like USB ports.
As soon as you have your brand new Ubuntu running, I suggest you to upgrade and reboot after:
sudo apt-get update
sudo apt-get upgrade
sudo apt-get dist-upgrade
reboot
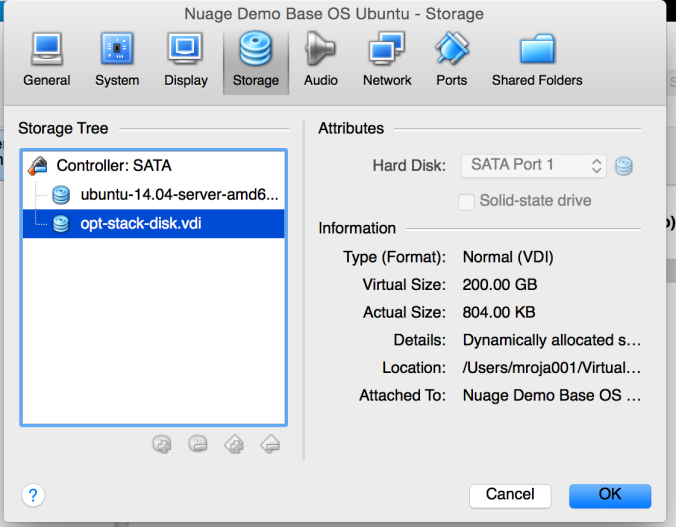
Now Let’s make more disk space into our brand new server. First add a disk as the following picture. I’ve defined 200GB for glance cache and nova images (/opt/stack).
After create these virtual devices now we have to partition and mount as the following way:
ubuntu@ubuntu-amd64:/var/lib$ sudo fdisk -l

Disk /dev/sda: 19.3 GB, 19327352832 bytes
255 heads, 63 sectors/track, 2349 cylinders, total 37748736 sectors
Units = sectors of 1 * 512 = 512 bytes
Sector size (logical/physical): 512 bytes / 512 bytes
I/O size (minimum/optimal): 512 bytes / 512 bytes
Disk identifier: 0x000c95b1

   Device Boot      Start         End      Blocks   Id  System
/dev/sda1   *        2048    36702207    18350080   83  Linux
/dev/sda2        36704254    37746687      521217    5  Extended
/dev/sda5        36704256    37746687      521216   82  Linux swap / Solaris

Disk /dev/sdb: 214.7 GB, 214748364800 bytes
255 heads, 63 sectors/track, 26108 cylinders, total 419430400 sectors
Units = sectors of 1 * 512 = 512 bytes
Sector size (logical/physical): 512 bytes / 512 bytes
I/O size (minimum/optimal): 512 bytes / 512 bytes
Disk identifier: 0x00000000

Disk /dev/sdb doesn't contain a valid partition table
ubuntu@ubuntu-amd64:/var/lib$ sudo fdisk /dev/sdb
Device contains neither a valid DOS partition table, nor Sun, SGI or OSF disklabel
Building a new DOS disklabel with disk identifier 0xa3859b8e.
Changes will remain in memory only, until you decide to write them.
After that, of course, the previous content won't be recoverable.

Warning: invalid flag 0x0000 of partition table 4 will be corrected by w(rite)

Command (m for help): n
Partition type:
   p   primary (0 primary, 0 extended, 4 free)
   e   extended
Select (default p):
Using default response p
Partition number (1-4, default 1):
Using default value 1
First sector (2048-419430399, default 2048):
Using default value 2048
Last sector, +sectors or +size{K,M,G} (2048-419430399, default 419430399):
Using default value 419430399

Command (m for help): p

Disk /dev/sdb: 214.7 GB, 214748364800 bytes
255 heads, 63 sectors/track, 26108 cylinders, total 419430400 sectors
Units = sectors of 1 * 512 = 512 bytes
Sector size (logical/physical): 512 bytes / 512 bytes
I/O size (minimum/optimal): 512 bytes / 512 bytes
Disk identifier: 0x8c9832c1

   Device Boot      Start         End      Blocks   Id  System
/dev/sdb1            2048   419430399   209714176   83  Linux

Command (m for help): w
The partition table has been altered!

Calling ioctl() to re-read partition table.
Syncing disks.
ubuntu@ubuntu-amd64:/var/lib$ sudo mkfs -t ext4 /dev/sdb1
mke2fs 1.42.9 (4-Feb-2014)
Filesystem label=
OS type: Linux
Block size=4096 (log=2)
Fragment size=4096 (log=2)
Stride=0 blocks, Stripe width=0 blocks
13107200 inodes, 52428544 blocks
2621427 blocks (5.00%) reserved for the super user
First data block=0
Maximum filesystem blocks=4294967296
1600 block groups
32768 blocks per group, 32768 fragments per group
8192 inodes per group
Superblock backups stored on blocks:
    32768, 98304, 163840, 229376, 294912, 819200, 884736, 1605632, 2654208,
    4096000, 7962624, 11239424, 20480000, 23887872

Allocating group tables: done
Writing inode tables: done
Creating journal (32768 blocks): done
Writing superblocks and filesystem accounting information: done

ubuntu@ubuntu-amd64:/var/lib$ df -h
Filesystem      Size  Used Avail Use% Mounted on
udev            5.9G  4.0K  5.9G   1% /dev
tmpfs           1.2G  420K  1.2G   1% /run
/dev/sda1        18G  3.1G   14G  20% /
none            4.0K     0  4.0K   0% /sys/fs/cgroup
none            5.0M     0  5.0M   0% /run/lock
none            5.9G     0  5.9G   0% /run/shm
none            100M     0  100M   0% /run/user
ubuntu@ubuntu-amd64:/var/lib$ sudo mkdir /opt/stack
ubuntu@ubuntu-amd64:/var/lib$ sudo mount /dev/sdb1 /opt/stack
ubuntu@ubuntu-amd64:/var/lib$ df -h
Filesystem      Size  Used Avail Use% Mounted on
udev            5.9G  4.0K  5.9G   1% /dev
tmpfs           1.2G  420K  1.2G   1% /run
/dev/sda1        18G  3.1G   14G  20% /
none            4.0K     0  4.0K   0% /sys/fs/cgroup
none            5.0M     0  5.0M   0% /run/lock
none            5.9G     0  5.9G   0% /run/shm
none            100M     0  100M   0% /run/user
/dev/sdb1       197G   52M  197G   1% /opt/stack
ubuntu@ubuntu-amd64:~$ sudo tune2fs -m 0 /dev/sdb1
tune2fs 1.42.9 (4-Feb-2014)
Setting reserved blocks percentage to 0% (0 blocks)
ubuntu@ubuntu-amd64:~$ sudo tune2fs -o journal_data_writeback /dev/sdb1
tune2fs 1.42.9 (4-Feb-2014)
Remember add the following lines to your /etc/fstab and reboot:
# /etc/fstab: static file system information.
#
# Use 'blkid' to print the universally unique identifier for a
# device; this may be used with UUID= as a more robust way to name devices
# that works even if disks are added and removed. See fstab(5).
#
#
# / was on /dev/sda1 during installation
UUID=7d4c7424-d351-4b70-8bc2-37f5e37d778b /               ext4    errors=remount-ro 0       1
# swap was on /dev/sda5 during installation
UUID=8ceef34f-b47a-4ce3-b3b4-5d93f24667e6 none            swap    sw              0       0
/dev/sdb1 /opt/stack ext4 noatime,nodiratime,data=writeback,barrier=0,nobh,errors=remount-ro 0 1
OS Base DevStack: Install and Configuration
Let’s get our devstack files:
ubuntu@ubuntu-amd64:~$ git clone https://git.openstack.org/openstack-dev/devstack
Cloning into 'devstack'...
remote: Counting objects: 33096, done.
remote: Compressing objects: 100% (15655/15655), done.
remote: Total 33096 (delta 23512), reused 26231 (delta 17015)
Receiving objects: 100% (33096/33096), 6.48 MiB | 747.00 KiB/s, done.
Resolving deltas: 100% (23512/23512), done.
Checking connectivity... done.
Let’s set our local.conf file for this setup. We define the main directory to store our project and data files: “/opt/stack” and others. Also, eth0 would be our main network interface to connect all services like databases and MQ. I’ve disabled horizon and cinder to save memory for instances. The secondary port eth1 would be our external interface attached to our public bridge br-ex (check out my post as a reference of OpenVSwitch ports at the Network node).
I’ve added also the serial_console option. VSD would require access thru console to start doing anything.
Locate this file at ~/devstack folder. Here you have the file that I’ve executed:
[[local|localrc]]
DEST=/opt/stack
SCREEN_LOGDIR=/opt/stack/screen-logs
SYSLOG=True
LOGFILE=~/devstack/stack.sh.log

HOST_IP=10.0.2.15
SERVICE_HOST=10.0.2.15
MYSQL_HOST=10.0.2.15
RABBIT_HOST=10.0.2.15
GLANCE_HOSTPORT=10.0.2.15:9292

ADMIN_PASSWORD=demonuage
DATABASE_PASSWORD=demonuage
RABBIT_PASSWORD=demonuage
SERVICE_PASSWORD=demonuage

# Do not use Nova-Network
disable_service n-net
# Do not use Horizon & Cinder
disable_service horizon
disable_service c-api c-sch c-vol
# Enable Neutron
ENABLED_SERVICES+=,q-svc,q-dhcp,q-meta,q-agt,q-l3
# Enable-Console
enable_service n-sproxy


## Neutron options
Q_USE_SECGROUP=True
FIXED_RANGE="192.168.1.0/24"
FIXED_NETWORK_SIZE=256
NETWORK_GATEWAY=192.168.1.1
PRIVATE_SUBNET_NAME=Nuage-Priv01

PUBLIC_SUBNET_NAME=Nuage-Public
FLOATING_RANGE="10.0.3.15/27"
Q_FLOATING_ALLOCATION_POOL=start=10.0.3.20,end=10.0.3.30
PUBLIC_NETWORK_GATEWAY="10.0.3.2"
Q_L3_ENABLED=True
PUBLIC_INTERFACE=eth1

# Open vSwitch provider networking configuration
Q_USE_PROVIDERNET_FOR_PUBLIC=True
OVS_PHYSICAL_BRIDGE=br-ex
PUBLIC_BRIDGE=br-ex
OVS_BRIDGE_MAPPINGS=public:br-ex
Other important thing is to define just one default gateway. devstack resets interfaces over the process and you connection to the outside could be messy. I’ve change eth1 to static and remove its default gw at /etc/network/interfaces file as follow:
# This file describes the network interfaces available on your system
# and how to activate them. For more information, see interfaces(5).

# The loopback network interface
auto lo
iface lo inet loopback

# The primary network interface
auto eth0
iface eth0 inet dhcp
    dns-nameservers 8.8.8.8

# The sec interface
auto eth1
iface eth1 inet static
    address 10.0.3.15
    netmask 255.255.255.0
    dns-nameservers 8.8.8.8
Your session’s user must to have sudo privileges. Now run ./stack.sh and wait. wait.. wait… until you get this message:
========================
DevStack Components Timed
========================

run_process - 69 secs
test_with_retry - 4 secs
apt-get-update - 19 secs
pip_install - 100 secs
restart_apache_server - 5 secs
wait_for_service - 18 secs
apt-get - 41 secs


This is your host IP address: 10.0.2.15
This is your host IPv6 address: ::1
Keystone is serving at http://10.0.2.15:5000/
The default users are: admin and demo
The password: demonuage
You will get this network interface configuration:
ubuntu@ubuntu-amd64:~/devstack$ ifconfig –a
br-ex     Link encap:Ethernet  HWaddr 08:00:27:ea:81:23
          inet addr:10.0.3.15  Bcast:10.0.3.255  Mask:255.255.255.0
          inet6 addr: fe80::34cf:80ff:fe38:387a/64 Scope:Link
          inet6 addr: 2001:db8::2/64 Scope:Global
          UP BROADCAST RUNNING  MTU:1500  Metric:1
          RX packets:18 errors:0 dropped:0 overruns:0 frame:0
          TX packets:13 errors:0 dropped:0 overruns:0 carrier:0
          collisions:0 txqueuelen:0
          RX bytes:1284 (1.2 KB)  TX bytes:1166 (1.1 KB)

br-int    Link encap:Ethernet  HWaddr 02:59:41:8a:01:44
          inet6 addr: fe80::105f:7bff:fef7:813d/64 Scope:Link
          UP BROADCAST RUNNING  MTU:1500  Metric:1
          RX packets:72 errors:0 dropped:0 overruns:0 frame:0
          TX packets:10 errors:0 dropped:0 overruns:0 carrier:0
          collisions:0 txqueuelen:0
          RX bytes:6416 (6.4 KB)  TX bytes:828 (828.0 B)

br-tun    Link encap:Ethernet  HWaddr d2:c5:95:1f:b2:41
          inet6 addr: fe80::2429:aff:fe60:2f8e/64 Scope:Link
          UP BROADCAST RUNNING  MTU:1500  Metric:1
          RX packets:0 errors:0 dropped:0 overruns:0 frame:0
          TX packets:10 errors:0 dropped:0 overruns:0 carrier:0
          collisions:0 txqueuelen:0
          RX bytes:0 (0.0 B)  TX bytes:828 (828.0 B)

eth0      Link encap:Ethernet  HWaddr 08:00:27:96:dd:d0
          inet addr:10.0.2.15  Bcast:10.0.2.255  Mask:255.255.255.0
          inet6 addr: fe80::a00:27ff:fe96:ddd0/64 Scope:Link
          UP BROADCAST RUNNING MULTICAST  MTU:1500  Metric:1
          RX packets:33395 errors:0 dropped:0 overruns:0 frame:0
          TX packets:20053 errors:0 dropped:0 overruns:0 carrier:0
          collisions:0 txqueuelen:1000
          RX bytes:18895091 (18.8 MB)  TX bytes:3757597 (3.7 MB)

eth1      Link encap:Ethernet  HWaddr 08:00:27:ea:81:23
          inet6 addr: fe80::a00:27ff:feea:8123/64 Scope:Link
          UP BROADCAST RUNNING MULTICAST  MTU:1500  Metric:1
          RX packets:187 errors:0 dropped:0 overruns:0 frame:0
          TX packets:210 errors:0 dropped:0 overruns:0 carrier:0
          collisions:0 txqueuelen:1000
          RX bytes:23744 (23.7 KB)  TX bytes:29124 (29.1 KB)

lo        Link encap:Local Loopback
          inet addr:127.0.0.1  Mask:255.0.0.0
          inet6 addr: ::1/128 Scope:Host
          UP LOOPBACK RUNNING  MTU:65536  Metric:1
          RX packets:122326 errors:0 dropped:0 overruns:0 frame:0
          TX packets:122326 errors:0 dropped:0 overruns:0 carrier:0
          collisions:0 txqueuelen:0
          RX bytes:64243895 (64.2 MB)  TX bytes:64243895 (64.2 MB)

ovs-system Link encap:Ethernet  HWaddr ee:ca:dd:82:73:83
          BROADCAST MULTICAST  MTU:1500  Metric:1
          RX packets:0 errors:0 dropped:0 overruns:0 frame:0
          TX packets:0 errors:0 dropped:0 overruns:0 carrier:0
          collisions:0 txqueuelen:0
          RX bytes:0 (0.0 B)  TX bytes:0 (0.0 B)

virbr0    Link encap:Ethernet  HWaddr ee:43:7c:62:b1:2d
          inet addr:192.168.122.1  Bcast:192.168.122.255  Mask:255.255.255.0
          UP BROADCAST MULTICAST  MTU:1500  Metric:1
          RX packets:0 errors:0 dropped:0 overruns:0 frame:0
          TX packets:0 errors:0 dropped:0 overruns:0 carrier:0
          collisions:0 txqueuelen:0
          RX bytes:0 (0.0 B)  TX bytes:0 (0.0 B)
Let’s set our env file to easier our job. You can copy ~/devstack/userrc_early to your home dir and run “source userrc_early”.
ubuntu@ubuntu-amd64:~$ cat userrc
# Use this for debugging issues before files in accrc are created

# Set up password auth credentials now that Keystone is bootstrapped
export OS_IDENTITY_API_VERSION=3
export OS_AUTH_URL=http://10.0.2.15:35357
export OS_USERNAME=demo
export OS_USER_DOMAIN_ID=default
export OS_PASSWORD=demonuage
export OS_PROJECT_NAME=demo
export OS_PROJECT_DOMAIN_ID=default
export OS_REGION_NAME=RegionOne
DevStack: Building some resources to our lab
We’ll create some elements in our lab to test our devstack. First of fall, let’s create some key pairs into the demo project. I used my own key into this VM. If you don’t have your keys in .ssh folder you can create them with “ssh-keygen -t rsa”. Then let’s download a Ubuntu cloud image to take into glance. I will create a flavor to save some resources called pin.1.
openstack keypair create --public-key ~/.ssh/id_rsa.pub my-keypair
wget https://cloud-images.ubuntu.com/trusty/current/trusty-server-cloudimg-amd64-disk1.img
glance image-create --name ubuntu-trusty-image --file trusty-server-cloudimg-amd64-disk1.img --disk-format qcow2 --container-format bare
# need admin access to add flavors. use ~/devstack/userrc_early credentials
openstack flavor create --ram 1024 --vcpus 1 --disk 5 --public pin.1
I’ve created a couple of network based on the demo architecture that I’ve shown. We are done to create our first server called jumpbox and add a secondary interface to our private network:
openstack network create public-demo
openstack network create private-demo
neutron subnet-create --dns-nameserver 8.8.8.8 --name public-demo public-demo 10.101.0.0/24
# preparing our subnet to use jumpbox as gateway/dns
neutron subnet-create --dns-nameserver 192.168.101.3 --gateway 192.168.101.3 --name private-demo private-demo 192.168.101.0/24
nova boot --image ubuntu-trusty-image --nic net-name=public-demo --flavor pin.1 --key-name my-keypair jumpbox
# use "nova list" to check how it's going
neutron port-create private-demo
# use "neutron port-list" to check out the ID to use over the next command
nova interface-attach --port-id e11de213-3141-465d-85a6-5957261ca395 jumpbox
Don’t forget to create your security group to bring ssh access to your instance.
openstack security group create ssh-access
openstack security group rule create --proto tcp --src-ip 0.0.0.0/0 --dst-port 22 ssh-access
openstack server add security group jumpbox ssh-access
I’ve added a route to connect this new server (route add –net 10.101.0.0/24 gw 10.0.3.20) thru router1 (use “neutron router-list” to check it). In case to use a physical server you will be able to add floating IPs to access this from your laptop (don’t forget to add your public key to authorized_keys file into .ssh). To add a floating ip you need to use IDs of your port and the floating ip. Maybe you will have to create a floating IPs. Here you have an example:
# before to add a floatingip, you need to create interface at router1 to subnet public-demo using ID of the subnet over the next command
neutron router-interface-add router1 971db454-91e2-4a04-af6c-75591a2b758b
neutron floatingip-create public
# use "neutron floatingip-list" to check available ips
neutron floatingip-associate ab73e086-0c70-4d67-80ab-a2c740d25b62 32144a6c-2d47-4e96-97b9-b144855b6a5e
Connect your jumpbox instance via IP address (i.e. 10.101.0.3). Don’t forget to add a route in your server thru the router (i.e sudo route add -net 10.101.0.0/24 gw 10.0.3.20) or access it thru console.
DevStack-Nova: Enable console access
To get access to console you need to install “novaconsole” via:
pip install git+http://github.com/larsks/novaconsole.gitMore details at github. Connect thru the follwing way to test your console connection.
ubuntu@ubuntu-amd64:~$ nova get-serial-console jumpbox
+--------+-----------------------------------------------------------------+
| Type   | Url                                                             |
+--------+-----------------------------------------------------------------+
| serial | ws://127.0.0.1:6083/?token=5c48b7ef-84dc-476c-a02e-7cd4a500ab68 |
+--------+-----------------------------------------------------------------+
ubuntu@ubuntu-amd64:~$ novaconsole  --url ws://127.0.0.1:6083/?token=5c48b7ef-84dc-476c-a02e-7cd4a500ab68
WARNING:novaconsole.client:connected to: ws://127.0.0.1:6083/?token=5c48b7ef-84dc-476c-a02e-7cd4a500ab68
WARNING:novaconsole.client:type "~." to disconnect

Ubuntu 14.04.4 LTS jumpbox ttyS0

jumpbox login:
See you into the next part!

Thanks for this.
What is loginid and pass for the nuage-demo-ubuntu-trusty-devstack-files-disk-net-changes
Hi Prakash, please bring more details. Not sure what is being asked. thanks