First of all, just a reminder that I’m using a fanless server 8 cores / 32 GB RAM at home (details at Diego’s post). And you will need to read my previous post: BUILDING A NUAGE/OPENSTACK DEMO AT HOME: GIVING PACKSTACK A CHANCE – CENTOS7.
Also, I want to say thanks to Scott Irwin for his scripts and Remi Vichery for his prompt support with my VSC.
This second part I will show you how to install Nuage VSP on PackStack. Most of the time those are installed using just KVM. However, I think you’ll have more fun doing on OpenStack. That way also, we’ll help us to make this demo portable to any other OpenStack instance.
Next, you will see how I am configuring these lab:
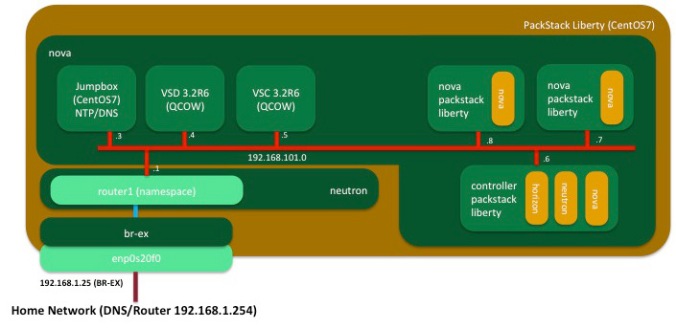
These are the instances that I am planing to have when I finish this journey

Important Note: before upload VSC image, be sure to have read NUAGE VSC – MODIFY QCOW2 IMAGES WITH GUESTFISH
Check your lab settings before start anything
We’ll check what we have so far. PackStack is already installed. We’ve done over the first part.
Checking the networks and subnets:
[root@box01 ~(keystone_admin)]# openstack network list
+--------------------------------------+------------------+--------------------------------------+
| ID | Name | Subnets |
+--------------------------------------+------------------+--------------------------------------+
| 9eec420a-eb76-4ebc-a814-3ce935b9bca2 | external_network | 407b139d-70b6-49c9-9056-e9211a41b7fb |
| 05235f6d-95fc-4455-a6a6-3d4077cab245 | nuage-lab | 60724bd0-8606-4c7a-bae1-7c31410dd456 |
+--------------------------------------+------------------+--------------------------------------+
[root@box01 ~(keystone_admin)]# openstack network show 9eec420a-eb76-4ebc-a814-3ce935b9bca2
+---------------------------+--------------------------------------+
| Field | Value |
+---------------------------+--------------------------------------+
| id | 9eec420a-eb76-4ebc-a814-3ce935b9bca2 |
| mtu | 0 |
| name | external_network |
| project_id | da64bceb671e4719b41de08c15e1eebe |
| provider:network_type | flat |
| provider:physical_network | extnet |
| provider:segmentation_id | None |
| router_type | External |
| shared | False |
| state | UP |
| status | ACTIVE |
| subnets | 407b139d-70b6-49c9-9056-e9211a41b7fb |
+---------------------------+--------------------------------------+
[root@box01 ~(keystone_admin)]# neutron subnet-show 407b139d-70b6-49c9-9056-e9211a41b7fb
+-------------------+--------------------------------------------------+
| Field | Value |
+-------------------+--------------------------------------------------+
| allocation_pools | {"start": "192.168.1.27", "end": "192.168.1.33"} |
| cidr | 192.168.1.0/24 |
| dns_nameservers | |
| enable_dhcp | False |
| gateway_ip | 192.168.1.254 |
| host_routes | |
| id | 407b139d-70b6-49c9-9056-e9211a41b7fb |
| ip_version | 4 |
| ipv6_address_mode | |
| ipv6_ra_mode | |
| name | public_subnet |
| network_id | 9eec420a-eb76-4ebc-a814-3ce935b9bca2 |
| subnetpool_id | |
| tenant_id | da64bceb671e4719b41de08c15e1eebe |
+-------------------+--------------------------------------------------+
Checking router in the lab’s tenant.
[root@box01 ~(keystone_nuage)]# neutron router-list
+--------------------------------------+--------------+------------------------------------------------------------------------------------------------------------------------------------------------------------------------------------------+
| id | name | external_gateway_info |
+--------------------------------------+--------------+------------------------------------------------------------------------------------------------------------------------------------------------------------------------------------------+
| b9d31b63-99c7-4d84-89e4-6c716210fb20 | nuage-router | {"network_id": "9eec420a-eb76-4ebc-a814-3ce935b9bca2", "enable_snat": true, "external_fixed_ips": [{"subnet_id": "407b139d-70b6-49c9-9056-e9211a41b7fb", "ip_address": "192.168.1.27"}]} |
+--------------------------------------+--------------+------------------------------------------------------------------------------------------------------------------------------------------------------------------------------------------+
[root@box01 ~(keystone_nuage)]# neutron subnet-list
+--------------------------------------+--------------+------------------+------------------------------------------------------+
| id | name | cidr | allocation_pools |
+--------------------------------------+--------------+------------------+------------------------------------------------------+
| 60724bd0-8606-4c7a-bae1-7c31410dd456 | nuage-subnet | 192.168.101.0/24 | {"start": "192.168.101.2", "end": "192.168.101.254"} |
+--------------------------------------+--------------+------------------+------------------------------------------------------+
[root@box01 ~(keystone_admin)]# . keystonerc_nuage
[root@box01 ~(keystone_nuage)]# neutron router-list
+--------------------------------------+--------------+------------------------------------------------------------------------------------------------------------------------------------------------------------------------------------------+
| id | name | external_gateway_info |
+--------------------------------------+--------------+------------------------------------------------------------------------------------------------------------------------------------------------------------------------------------------+
| b9d31b63-99c7-4d84-89e4-6c716210fb20 | nuage-router | {"network_id": "9eec420a-eb76-4ebc-a814-3ce935b9bca2", "enable_snat": true, "external_fixed_ips": [{"subnet_id": "407b139d-70b6-49c9-9056-e9211a41b7fb", "ip_address": "192.168.1.27"}]} |
+--------------------------------------+--------------+------------------------------------------------------------------------------------------------------------------------------------------------------------------------------------------+
We’ll update the subnet to define a dhcp address pool to avoid any conflict with our instances.
[root@box01 ~(keystone_nuage)]# neutron subnet-update --allocation-pool start=192.168.101.50,end=192.168.101.254 nuage-subnet
Updated subnet: nuage-subnet
Preparing our images and flavor
Create the flavor and upload the images to glance for our jumpbox (local NTP/DNS server), VSD, VSC and our nested PackStack (Controller and Nova servers).
[root@box01 ~(keystone_admin)]# openstack flavor create --ram 1024 --disk 10 --vcpus 1 --public nuage.tiny
+----------------------------+--------------------------------------+
| Field | Value |
+----------------------------+--------------------------------------+
| OS-FLV-DISABLED:disabled | False |
| OS-FLV-EXT-DATA:ephemeral | 0 |
| disk | 10 |
| id | a9559f30-3914-4227-8201-5fd7e1262b3d |
| name | nuage.tiny |
| os-flavor-access:is_public | True |
| ram | 1024 |
| rxtx_factor | 1.0 |
| swap | |
| vcpus | 1 |
+----------------------------+--------------------------------------+
[root@box01 ~(keystone_admin)]# openstack flavor create --ram 4096 --disk 10 --vcpus 4 --public nuage.vsc
+----------------------------+--------------------------------------+
| Field | Value |
+----------------------------+--------------------------------------+
| OS-FLV-DISABLED:disabled | False |
| OS-FLV-EXT-DATA:ephemeral | 0 |
| disk | 10 |
| id | 6a17cd1c-ee29-4f29-a4c9-14852a1e0394 |
| name | nuage.vsc |
| os-flavor-access:is_public | True |
| ram | 4096 |
| rxtx_factor | 1.0 |
| swap | |
| vcpus | 4 |
+----------------------------+--------------------------------------+

[root@box01 ~(keystone_admin)]# openstack flavor create --ram 8192 --disk 108 --vcpus 4 --public nuage.vsd
+----------------------------+--------------------------------------+
| Field | Value |
+----------------------------+--------------------------------------+
| OS-FLV-DISABLED:disabled | False |
| OS-FLV-EXT-DATA:ephemeral | 0 |
| disk | 108 |
| id | d4a3eda0-b2e2-4d86-b28a-357e8b94166c |
| name | nuage.vsd |
| os-flavor-access:is_public | True |
| ram | 8192 |
| rxtx_factor | 1.0 |
| swap | |
| vcpus | 4 |
+----------------------------+--------------------------------------+
[root@box01 ~(keystone_admin)]# openstack flavor create --ram 2048 --disk 20 --vcpus 2 --public nuage.osc
+----------------------------+--------------------------------------+
| Field | Value |
+----------------------------+--------------------------------------+
| OS-FLV-DISABLED:disabled | False |
| OS-FLV-EXT-DATA:ephemeral | 0 |
| disk | 20 |
| id | ba637f8a-aff4-4e53-b758-d946c2242b6d |
| name | nuage.osc |
| os-flavor-access:is_public | True |
| ram | 2048 |
| rxtx_factor | 1.0 |
| swap | |
| vcpus | 2 |
+----------------------------+--------------------------------------+
[root@box01 ~(keystone_admin)]# openstack flavor create --ram 5120 --disk 50 --vcpus 4 --public nuage.nova
+----------------------------+--------------------------------------+
| Field | Value |
+----------------------------+--------------------------------------+
| OS-FLV-DISABLED:disabled | False |
| OS-FLV-EXT-DATA:ephemeral | 0 |
| disk | 50 |
| id | 88c0cc7c-8aca-4374-aad1-c54c955ab754 |
| name | nuage.nova |
| os-flavor-access:is_public | True |
| ram | 5120 |
| rxtx_factor | 1.0 |
| swap | |
| vcpus | 4 |
+----------------------------+--------------------------------------+
Let’s install wget to download our CentOS7 image
[root@box01 ~(keystone_admin)]# yum -y install wget
Loaded plugins: fastestmirror
#
# some boring lines
# more boring lines
#
Installed:
wget.x86_64 0:1.14-10.el7_0.1

Complete!
[root@box01 ~(keystone_admin)]# wget http://cloud.centos.org/centos/7/images/CentOS-7-x86_64-GenericCloud.qcow2
--2016-05-05 18:18:14-- http://cloud.centos.org/centos/7/images/CentOS-7-x86_64-GenericCloud.qcow2
Resolving cloud.centos.org (cloud.centos.org)... 162.252.80.138
Connecting to cloud.centos.org (cloud.centos.org)|162.252.80.138|:80... connected.
HTTP request sent, awaiting response... 200 OK
Length: 912654336 (870M)
Saving to: ‘CentOS-7-x86_64-GenericCloud.qcow2’

100%[================================================================================================================>] 912,654,336 5.66MB/s in 43s

2016-05-05 18:18:57 (20.3 MB/s) - ‘CentOS-7-x86_64-GenericCloud.qcow2’ saved [912654336/912654336]
Let’s create our jumbox image:
[root@box01 ~(keystone_admin)]# openstack image create --file CentOS-7-x86_64-GenericCloud.qcow2 --disk-format qcow2 --public --container-format bare centos7-image
+------------------+--------------------------------------+
| Property | Value |
+------------------+--------------------------------------+
| checksum | 6008a645f61baffe0d19dfe992def8a6 |
| container_format | bare |
| created_at | 2016-05-05T23:19:33Z |
| disk_format | qcow2 |
| id | e9ee4c2a-006b-4d53-a158-47ec6bb6c422 |
| min_disk | 0 |
| min_ram | 0 |
| name | centos7-image |
| owner | da64bceb671e4719b41de08c15e1eebe |
| protected | False |
| size | 912654336 |
| status | active |
| tags | [] |
| updated_at | 2016-05-05T23:19:43Z |
| virtual_size | None |
| visibility | private |
+------------------+--------------------------------------+
Create your VSD and VSC images. I’ve got them in my laptop, then I have to copy them thru scp.
[root@box01 ~(keystone_nuage)]# ls *.qcow2
CentOS-7-x86_64-GenericCloud.qcow2 vsc_singledisk.qcow2 VSD-3.2.6_230.qcow2
[root@box01 ~(keystone_nuage)]# . keystonerc_admin
[root@box01 ~(keystone_admin)]# openstack image create --file VSD-3.2.6_230.qcow2 --disk-format qcow2 --public --container-format bare VSD32R6
+------------------+--------------------------------------+
| Property | Value |
+------------------+--------------------------------------+
| checksum | a1419434721c53bf3c848896c48de7d5 |
| container_format | bare |
| created_at | 2016-05-06T13:14:31Z |
| disk_format | qcow2 |
| id | aff1535d-570b-4e19-98de-9c27cde94784 |
| min_disk | 0 |
| min_ram | 0 |
| name | VSD32R6 |
| owner | da64bceb671e4719b41de08c15e1eebe |
| protected | False |
| size | 5573574656 |
| status | active |
| tags | [] |
| updated_at | 2016-05-06T13:15:22Z |
| virtual_size | None |
| visibility | private |
+------------------+--------------------------------------+
[root@box01 ~(keystone_admin)]# openstack image create --file vsc_singledisk-dhcp.qcow2 --disk-format qcow2 --public --container-format bare VSC32R6
+------------------+--------------------------------------+
| Property | Value |
+------------------+--------------------------------------+
| checksum | 95a481632192ad8ea3f8701846b0c5ff |
| container_format | bare |
| created_at | 2016-05-06T13:31:55Z |
| disk_format | qcow2 |
| id | abcb1b0b-0389-4f07-b3a3-36bc2d0c0507 |
| min_disk | 0 |
| min_ram | 0 |
| name | VSC32R6 |
| owner | da64bceb671e4719b41de08c15e1eebe |
| protected | False |
| size | 45613056 |
| status | active |
| tags | [] |
| updated_at | 2016-05-06T13:31:56Z |
| virtual_size | None |
| visibility | private |
+------------------+--------------------------------------+
We need to create our keypair. I will use my laptop public key. And I will copy it as following:
usmovnmroja001:~ mroja001$ scp .ssh/id_rsa.pub root@192.168.1.25:/root
root@192.168.1.25's password:
id_rsa.pub 100% 414 0.4KB/s 00:00
Now, create your keypair using this public key file as following:
[root@box01 ~(keystone_admin)]# . keystonerc_nuage
[root@box01 ~(keystone_nuage)]# openstack keypair create --public-key id_rsa.pub pin-laptop
+-------------+-------------------------------------------------+
| Field | Value |
+-------------+-------------------------------------------------+
| fingerprint | b6:01:9c:76:a6:e6:d8:04:38:27:5d:8f:92:20:f3:32 |
| name | pin-laptop |
| user_id | c91cd992e79149209c41416a55a661b1 |
+-------------+-------------------------------------------------+
Creating your servers
Time to create your servers: jumpbox (local NTP/DNS server), VSC and VSD.
[root@box01 ~(keystone_nuage)]# openstack server create --image centos7-image --flavor nuage.tiny --key-name pin-laptop --nic net-id=nuage-lab,v4-fixed-ip=192.168.101.3 jumpbox
+--------------------------------------+------------------------------------------------------+
| Field | Value |
+--------------------------------------+------------------------------------------------------+
| OS-DCF:diskConfig | MANUAL |
| OS-EXT-AZ:availability_zone | |
| OS-EXT-STS:power_state | 0 |
| OS-EXT-STS:task_state | scheduling |
| OS-EXT-STS:vm_state | building |
| OS-SRV-USG:launched_at | None |
| OS-SRV-USG:terminated_at | None |
| accessIPv4 | |
| accessIPv6 | |
| addresses | |
| adminPass | id9AYj3o7WqE |
| config_drive | |
| created | 2016-05-06T13:56:02Z |
| flavor | nuage.tiny (a9559f30-3914-4227-8201-5fd7e1262b3d) |
| hostId | |
| id | f71bb396-47a8-477f-8f6b-8390769cfa73 |
| image | centos7-image (e9ee4c2a-006b-4d53-a158-47ec6bb6c422) |
| key_name | pin-laptop |
| name | jumpbox |
| os-extended-volumes:volumes_attached | [] |
| progress | 0 |
| project_id | 39e2f35bc10f4047b1ea77f79559807d |
| properties | |
| security_groups | [{u'name': u'default'}] |
| status | BUILD |
| updated | 2016-05-06T13:56:02Z |
| user_id | c91cd992e79149209c41416a55a661b1 |
+--------------------------------------+------------------------------------------------------+
[root@box01 ~(keystone_nuage)]# openstack server create --image VSD32R6 --flavor nuage.vsd --key-name pin-laptop --nic net-id=nuage-lab,v4-fixed-ip=192.168.101.4 vsd01
+--------------------------------------+--------------------------------------------------+
| Field | Value |
+--------------------------------------+--------------------------------------------------+
| OS-DCF:diskConfig | MANUAL |
| OS-EXT-AZ:availability_zone | |
| OS-EXT-STS:power_state | 0 |
| OS-EXT-STS:task_state | scheduling |
| OS-EXT-STS:vm_state | building |
| OS-SRV-USG:launched_at | None |
| OS-SRV-USG:terminated_at | None |
| accessIPv4 | |
| accessIPv6 | |
| addresses | |
| adminPass | SGsdF4DvkPVo |
| config_drive | |
| created | 2016-05-06T13:57:34Z |
| flavor | nuage.vsd (d4a3eda0-b2e2-4d86-b28a-357e8b94166c) |
| hostId | |
| id | 5befd9f3-98d5-404a-a1a7-ce1fa03127e8 |
| image | VSD32R6 (aff1535d-570b-4e19-98de-9c27cde94784) |
| key_name | pin-laptop |
| name | vsd01 |
| os-extended-volumes:volumes_attached | [] |
| progress | 0 |
| project_id | 39e2f35bc10f4047b1ea77f79559807d |
| properties | |
| security_groups | [{u'name': u'default'}] |
| status | BUILD |
| updated | 2016-05-06T13:57:34Z |
| user_id | c91cd992e79149209c41416a55a661b1 |
+--------------------------------------+--------------------------------------------------+
[root@box01 ~(keystone_nuage)]# openstack server create --image VSC32R6 --flavor nuage.vsc --key-name pin-laptop --nic net-id=nuage-lab,v4-fixed-ip=192.168.101.5 vsc01
+--------------------------------------+--------------------------------------------------+
| Field | Value |
+--------------------------------------+--------------------------------------------------+
| OS-DCF:diskConfig | MANUAL |
| OS-EXT-AZ:availability_zone | |
| OS-EXT-STS:power_state | 0 |
| OS-EXT-STS:task_state | scheduling |
| OS-EXT-STS:vm_state | building |
| OS-SRV-USG:launched_at | None |
| OS-SRV-USG:terminated_at | None |
| accessIPv4 | |
| accessIPv6 | |
| addresses | |
| adminPass | wCM4DzJijau9 |
| config_drive | |
| created | 2016-05-06T13:58:10Z |
| flavor | nuage.vsc (6a17cd1c-ee29-4f29-a4c9-14852a1e0394) |
| hostId | |
| id | 77a75f63-4615-4479-ace2-e0b21e70a038 |
| image | VSC32R6 (abcb1b0b-0389-4f07-b3a3-36bc2d0c0507) |
| key_name | pin-laptop |
| name | vsc01 |
| os-extended-volumes:volumes_attached | [] |
| progress | 0 |
| project_id | 39e2f35bc10f4047b1ea77f79559807d |
| properties | |
| security_groups | [{u'name': u'default'}] |
| status | BUILD |
| updated | 2016-05-06T13:58:10Z |
| user_id | c91cd992e79149209c41416a55a661b1 |
+--------------------------------------+--------------------------------------------------+
[root@box01 ~(keystone_nuage)]# nova list
+--------------------------------------+---------+--------+------------+-------------+-------------------------+
| ID | Name | Status | Task State | Power State | Networks |
+--------------------------------------+---------+--------+------------+-------------+-------------------------+
| f71bb396-47a8-477f-8f6b-8390769cfa73 | jumpbox | ACTIVE | - | Running | nuage-lab=192.168.101.3 |
| 77a75f63-4615-4479-ace2-e0b21e70a038 | vsc01 | ACTIVE | - | Running | nuage-lab=192.168.101.5 |
| 0f572cb6-d4a4-4b8a-b277-eb55fc859c68 | vsd01 | ACTIVE | - | Running | nuage-lab=192.168.101.4 |
+--------------------------------------+---------+--------+------------+-------------+-------------------------+
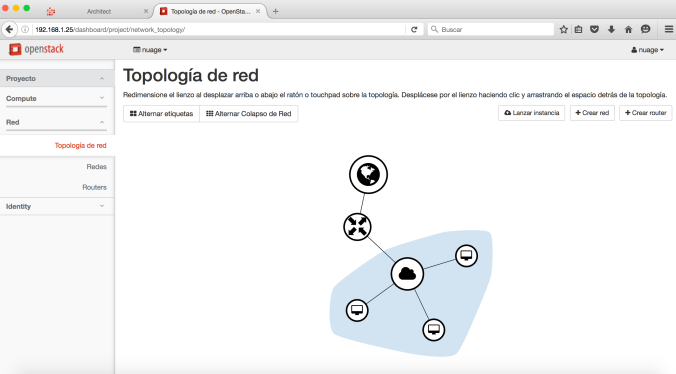
Lab topology so far (remember use nuage/foo credentials to access your horizon at http://192.168.1.25/dashboard)
Jumpbox: Creating your DNS and NTP local server
We’ll start configuring NTP and DNS service in jumpbox. Assign Floating IP to your jumpbox to get access from outside.
[root@box01 ~(keystone_nuage)]# openstack ip floating pool list
+------------------+
| Name |
+------------------+
| external_network |
+------------------+
[root@box01 ~(keystone_nuage)]# openstack ip floating create external_network
+-------------+--------------------------------------+
| Field | Value |
+-------------+--------------------------------------+
| fixed_ip | None |
| id | ca767cc0-fc65-4d74-8e4a-d2ef555c6b0d |
| instance_id | None |
| ip | 192.168.1.28 |
| pool | external_network |
+-------------+--------------------------------------+
[root@box01 ~(keystone_nuage)]# openstack ip floating add 192.168.1.28 jumpbox
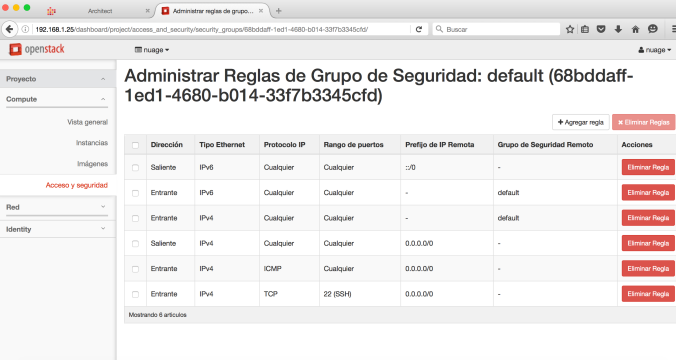
Add security rules to default group to open ssh and ping port.
Let’s start with network settings…
usmovnmroja001:~ mroja001$ ssh centos@192.168.1.28
The authenticity of host '192.168.1.28 (192.168.1.28)' can't be established.
RSA key fingerprint is d9:f2:5e:95:96:94:48:a2:4a:63:2e:6b:e0:31:fa:a0.
Are you sure you want to continue connecting (yes/no)? yes
Warning: Permanently added '192.168.1.28' (RSA) to the list of known hosts.
[centos@jumpbox ~]$ su -
password: #you need to change the password before
[root@jumpbox ~]# cat /etc/hosts
127.0.0.1 localhost
192.168.101.3 jumpbox jumpbox.nuage.lab
[root@jumpbox ~]# cat /etc/hostname
jumpbox.nuage.lab
[root@jumpbox ~]# cat /etc/sysconfig/network-scripts/ifcfg-eth0
DEVICE="eth0"
BOOTPROTO="dhcp"
ONBOOT="yes"
TYPE="Ethernet"
USERCTL="yes"
PEERDNS="yes"
IPV6INIT="no"
PERSISTENT_DHCLIENT="1"
[root@jumpbox ~]# cat /etc/resolv.conf
; generated by /usr/sbin/dhclient-script
search nuage.lab
nameserver 192.168.1.254
[root@jumpbox ~]# ping www.google.com
PING www.google.com (64.233.176.99) 56(84) bytes of data.
64 bytes from yw-in-f99.1e100.net (64.233.176.99): icmp_seq=1 ttl=43 time=23.3 ms
64 bytes from yw-in-f99.1e100.net (64.233.176.99): icmp_seq=2 ttl=43 time=22.9 ms
Jumpbox: Install your DNS local server
Time to install bind and get our DNS.
[root@jumpbox ~]# yum -y install bind bind-utils
Loaded plugins: fastestmirror
Loading mirror speeds from cached hostfile
#
#some boring lines....
#more boring lines....
Installed:
bind.x86_64 32:9.9.4-29.el7_2.3 bind-utils.x86_64 32:9.9.4-29.el7_2.3

Dependency Installed:
bind-libs.x86_64 32:9.9.4-29.el7_2.3

Complete!
We have to create DNS zones and entries as following:
[root@jumpbox ~]# cat /etc/named.conf
acl "trusted" {
192.168.101.3; # ns1 - can be set to localhost
192.168.101.4;
192.168.101.5;
192.168.101.6;
192.168.101.7;
192.168.101.8;
};

options {
directory "/var/cache/bind";

recursion yes; # enables resursive queries
allow-recursion { trusted; }; # allows recursive queries from "trusted" clients
listen-on { 192.168.101.3; }; # ns1 private IP address - listen on private network only
allow-transfer { none; }; # disable zone transfers by default

forwarders {
8.8.8.8;
8.8.4.4;
};

};
include "/etc/named/named.conf.local";
[root@jumpbox ~]# cat /etc/named/named.conf.local
zone "nuage.lab" {
type master;
file "/etc/named/zones/db.nuage.lab"; # zone file path
};

zone "101.168.192.in-addr.arpa" {
type master;
file "/etc/named/zones/db.101.168.192"; # 192.168.101/24 subnet
};

[root@jumpbox ~]# cat /etc/named/zones/db.nuage.lab
;
; BIND data file for local loopback interface
;
$TTL 604800
@ IN SOA jumpbox.nuage.lab. admin.nuage.lab (
3 ; Serial
604800 ; Refresh
86400 ; Retry
2419200 ; Expire
604800 ) ; Negative Cache TTL
;
; name servers - NS records
IN NS jumpbox.nuage.lab.

; name servers - A records
jumpbox.nuage.lab. IN A 192.168.101.3

; 192.168.101.0/16 - A records
vsd01.nuage.lab. IN A 192.168.101.4
xmpp IN CNAME vsd01
vsc01.nuage.lab. IN A 192.168.101.5
osc01.nuage.lab. IN A 192.168.101.6
nova01.nuage.lab. IN A 192.168.101.7
nova02.nuage.lab. IN A 192.168.101.7

; SRV records
_xmpp-client._tcp IN SRV 10 0 5222 vsd01.nuage.lab.
[root@jumpbox ~]# cat /etc/named/zones/db.101.168.192
;
; BIND reverse data file for local loopback interface
;
$TTL 604800
@ IN SOA jumpbox.nuage.lab. admin.nuage.lab. (
3 ; Serial
604800 ; Refresh
86400 ; Retry
2419200 ; Expire
604800 ) ; Negative Cache TTL
; name servers
IN NS jumpbox.nuage.lab.

; PTR Records
3 IN PTR jumpbox.nuage.lab. ; 192.168.101.3
4 IN PTR vsd01.nuage.lab. ; 192.168.101.4
5 IN PTR vsc01.nuage.lab. ; 192.168.101.5
6 IN PTR osc01.nuage.lab. ; 192.168.101.6
7 IN PTR nova01.nuage.lab. ; 192.168.101.7
8 IN PTR nova02.nuage.lab. ; 192.168.101.8
last settings to make our DNS works
[root@jumpbox ~]# mkdir /var/cache/bind
[root@jumpbox ~]# systemctl start named
[root@jumpbox ~]# cat /etc/resolv.conf
; generated by /usr/sbin/dhclient-script
search nuage.lab
nameserver 192.168.101.3
Test your local DNS
[root@jumpbox ~]# nslookup vsd01
Server: 192.168.101.3
Address: 192.168.101.3#53

Name: vsd01.nuage.lab
Address: 192.168.101.4

[root@jumpbox ~]# nslookup vsd01.nuage.lab
Server: 192.168.101.3
Address: 192.168.101.3#53

Name: vsd01.nuage.lab
Address: 192.168.101.4

[root@jumpbox ~]# nslookup 192.168.101.4
Server: 192.168.101.3
Address: 192.168.101.3#53

4.101.168.192.in-addr.arpa name = vsd01.nuage.lab.
Jumpbox: Install your NTP local server
We’ll install ntp as following:
[root@jumpbox ~]# yum -y install ntp
Loaded plugins: fastestmirror
Loading mirror speeds from cached hostfile
# boring lines
# more boring lines
# more boris lines...
Installed:
ntp.x86_64 0:4.2.6p5-22.el7.centos.1

Dependency Installed:
autogen-libopts.x86_64 0:5.18-5.el7 ntpdate.x86_64 0:4.2.6p5-22.el7.centos.1

Complete!
Modify your ntp.conf file
[root@jumpbox ~]# cat /etc/ntp.conf
driftfile /var/lib/ntp/drift
restrict default nomodify notrap nopeer noquery
restrict 127.0.0.1
restrict ::1

restrict 192.168.101.0 mask 255.255.255.0 nomodify notrap
restrict 192.168.1.0 mask 255.255.255.0 nomodify notrap

server ntp1.jst.mfeed.ad.jp iburst
server ntp2.jst.mfeed.ad.jp iburst
server ntp3.jst.mfeed.ad.jp iburst

includefile /etc/ntp/crypto/pw

keys /etc/ntp/keys

disable monitor
Let’s speed up the sync as following:
[root@jumpbox ~]# ntpdate -u ntp3.jst.mfeed.ad.jp
6 May 15:08:52 ntpdate[16769]: adjust time server 210.173.160.87 offset 0.037419 sec
[root@jumpbox ~]# ntpdate -u ntp2.jst.mfeed.ad.jp
6 May 15:09:14 ntpdate[16770]: adjust time server 210.173.160.57 offset 0.020899 sec
[root@jumpbox ~]# systemctl start ntpd
[root@jumpbox ~]# ntpstat
synchronised to NTP server (210.173.160.27) at stratum 3
time correct to within 8132 ms
polling server every 64 s
[root@jumpbox ~]# ntpq -cpe -cas
remote refid st t when poll reach delay offset jitter
==============================================================================
+ntp1.jst.mfeed. 133.243.236.17 2 u 17 64 1 190.149 26.285 3.164
*ntp2.jst.mfeed. 133.243.236.17 2 u 16 64 1 169.770 18.778 2.302
+ntp3.jst.mfeed. 133.243.236.17 2 u 15 64 1 168.504 12.655 2.307

ind assid status conf reach auth condition last_event cnt
===========================================================
1 55973 943a yes yes none candidate sys_peer 3
2 55974 963a yes yes none sys.peer sys_peer 3
3 55975 9424 yes yes none candidate reachable 2
VSD: Configuring Virtualized Services Director v32.R6
Attach a floating ip to VSD instance and updating nameserver into the subnet
Don’t forget to add other rule in default security group to access local NTP.
[root@box01 ~]# . keystonerc_nuage
[root@box01 ~(keystone_nuage)]# openstack ip floating create external_network
+-------------+--------------------------------------+
| Field | Value |
+-------------+--------------------------------------+
| fixed_ip | None |
| id | 91903e82-362b-4ab0-9bfb-437b443fa9ed |
| instance_id | None |
| ip | 192.168.1.29 |
| pool | external_network |
+-------------+--------------------------------------+
[root@box01 ~(keystone_nuage)]# openstack ip floating add 192.168.1.29 vsd01
[root@box01 ~(keystone_nuage)]# neutron subnet-update --dns-nameserver 192.168.101.3 nuage-subnet
Updated subnet: nuage-subnet
[root@box01 ~(keystone_nuage)]# openstack security group rule create --proto udp --dst-port 123 default
Reboot you VSD01 to get the last change to your subnet
We’ll prepare server before the VSD installation: change network settings, add NTP server to ntp.conf, change timezone and syncup time.
usmovnmroja001:~ mroja001$ ssh root@192.168.1.29
The authenticity of host '192.168.1.29 (192.168.1.29)' can't be established.
RSA key fingerprint is 7d:60:cd:5e:2e:08:6e:e1:f2:1d:28:a8:55:ae:23:7c.
Are you sure you want to continue connecting (yes/no)? yes
Warning: Permanently added '192.168.1.29' (RSA) to the list of known hosts.
root@192.168.1.29's password:
Last login: Fri May 8 21:09:15 2015

Welcome to VSD. (3.2.6_230)

[root@host-192-168-101-4 ~]# hostname vsd01.nuage.lab
[root@host-192-168-101-4 ~]# hostname -f
vsd01.nuage.lab
[root@host-192-168-101-4 ~]# hostname
vsd01.nuage.lab
[root@host-192-168-101-4 ~]# cat /etc/resolv.conf
; generated by /sbin/dhclient-script
search nuage.lab
nameserver 192.168.101.3
[root@host-192-168-101-4 ~]# cat /etc/sysconfig/network-scripts/ifcfg-eth0
DEVICE="eth0"
IPV6INIT="yes"
NM_CONTROLLED="yes"
ONBOOT="yes"
TYPE="Ethernet"
BOOTPROTO="dhcp"
[root@host-192-168-101-4 ~]# cat /etc/hosts
127.0.0.1 localhost
192.168.101.4 vsd01.nuage.lab vsd01
[root@host-192-168-101-4 ~]# cat /etc/ntp.conf
driftfile /var/lib/ntp/drift

restrict default kod nomodify notrap nopeer noquery
restrict -6 default kod nomodify notrap nopeer noquery

restrict 127.0.0.1
restrict -6 ::1

server jumpbox.nuage.lab iburst
server 0.centos.pool.ntp.org iburst
server 1.centos.pool.ntp.org iburst
server 2.centos.pool.ntp.org iburst
server 3.centos.pool.ntp.org iburst

includefile /etc/ntp/crypto/pw

keys /etc/ntp/keys

[root@vsd01 ~]# ntpdate -u jumpbox.nuage.lab
6 May 20:57:18 ntpdate[1363]: adjust time server 192.168.101.3 offset 0.001624 sec
[root@vsd01 ~]# service ntpd start
Starting ntpd:
[root@vsd01 ~]# ntpstat
synchronised to NTP server (216.218.254.202) at stratum 2
time correct to within 51 ms
polling server every 64 s
[root@vsd01 ~]# rm /etc/localtime
rm: remove regular file `/etc/localtime'? y
[root@vsd01 ~]# sudo ln -s /usr/share/zoneinfo/US/Central /etc/localtime
All set to start our installation. execute /opt/vsd/install.sh
[root@vsd01 ~]# /opt/vsd/install.sh
-------------------------------------------------------------
V I R T U A L I Z E D S E R V I C E S D I R E C T O R Y
version 3.2.6_230
(c) 2015 Nuage Networks
-------------------------------------------------------------
Error: FQDN vsd01 missing the domain part
[root@vsd01 ~]# vi /etc/hosts
[root@vsd01 ~]# hostname -f
vsd01.nuage.lab
[root@vsd01 ~]# /opt/vsd/install.sh
-------------------------------------------------------------
V I R T U A L I Z E D S E R V I C E S D I R E C T O R Y
version 3.2.6_230
(c) 2015 Nuage Networks
-------------------------------------------------------------
VSD supports two configurations:
1) HA, consisting of 3 redundant installs of VSD with a cluster name node server.
2) Standalone, where all services are installed on a single machine.
Is this a redundant (r) or standalone (s) installation [r|s]? (default=s): s
WARN: Memory is at 7872 MB; 16GB is preferred
Deploy VSD on single host vsd01.nuage.lab ...
Continue [y|n]? (default=y): y
Starting VSD deployment. This may take as long as 20 minutes in some situations ...
VSD package deployment and configuration DONE. Please initialize VSD.
DONE: VSD deployed.
Starting VSD initialization. This may take as long as 20 minutes in some situations ...
A self-signed certificate has been generated to get you started using VSD.
VSD installed and the services have started.
Wait a few minutes….
Now you can check your services:
[root@vsd01 ~]#
[root@vsd01 ~]#
[root@vsd01 ~]# monit summary
The Monit daemon 5.15 uptime: 3m

Program 'vsd-stats-status' Status failed
Program 'vsd-core-status' Status failed
Program 'vsd-common-status' Status ok
Process 'tca-daemon' Initializing
Program 'tca-daemon-status' Initializing
Process 'stats-collector' Initializing
Program 'stats-collector-status' Initializing
Process 'opentsdb' Running
Program 'opentsdb-status' Status failed
Program 'ntp-status' Status ok
Process 'mysql' Running
Program 'mysql-status' Status ok
Process 'mediator' Running
Program 'mediator-status' Initializing
File 'jboss-console-log' Accessible
File 'monit-log' Accessible
File 'mediator-out' Does not exist
File 'stats-out' Does not exist
File 'tca-daemon-out' Does not exist
Program 'keyserver-status' Status ok
Process 'jboss' Running
Program 'jboss-status' Status ok
Process 'hbase' Running
Program 'hbase-status' Status ok
Program 'ejbca-status' Status ok
Process 'ejabberd' Running
Program 'ejabberd-status' Status ok
System 'vsd01.nuage.lab' Running
It’s important to understand how to gracefully restart these services as following (you need to wait some time between commands until services come up ‘ok’). We’ll keep stats down to avoid annoying messages later. This is matter for other post.
[root@vsd01 ~]# monit -g vsd-stats stop
# Wait for all the vsd-stats services to show as “Not Monitored”.
[root@vsd01 ~]# monit -g vsd-core stop
# Wait for all the vsd-core services to show as “Not Monitored”.
[root@vsd01 ~]# monit -g vsd-common stop
# Wait for all the vsd-common services to show as “Not Monitored”.
[root@vsd01 ~]# monit -g vsd-common start
# Wait for all the vsd-common services to show as “status ok”.
[root@vsd01 ~]# monit -g vsd-core start
# Wait for all the vsd-common services to show as “status ok”.
# I will keep vsd-stats down
[root@vsd01 ~]# monit summary
The Monit daemon 5.15 uptime: 17m

Program 'vsd-stats-status' Not monitored
Program 'vsd-core-status' Status ok
Program 'vsd-common-status' Status ok
Process 'tca-daemon' Not monitored
Program 'tca-daemon-status' Not monitored
Process 'stats-collector' Not monitored
Program 'stats-collector-status' Not monitored
Process 'opentsdb' Not monitored
Program 'opentsdb-status' Not monitored
Program 'ntp-status' Status ok
Process 'mysql' Running
Program 'mysql-status' Status ok
Process 'mediator' Running
Program 'mediator-status' Status ok
File 'jboss-console-log' Accessible
File 'monit-log' Accessible
File 'mediator-out' Accessible
File 'stats-out' Accessible
File 'tca-daemon-out' Accessible
Program 'keyserver-status' Status failed
Process 'jboss' Running
Program 'jboss-status' Status ok
Process 'hbase' Not monitored
Program 'hbase-status' Not monitored
Program 'ejbca-status' Status ok
Process 'ejabberd' Running
Program 'ejabberd-status' Status ok
System 'vsd01.nuage.lab' Running
We need to open tcp 8443 port to access vsd console
Switch again to your OS controller and add the required security group.
[root@box01 ~(keystone_nuage)]# openstack security group create vsd
+-------------+--------------------------------------+
| Field | Value |
+-------------+--------------------------------------+
| description | vsd |
| id | 7ff1256c-aeec-4dac-9cf8-ff6ae9c7ab04 |
| name | vsd |
| rules | [] |
| tenant_id | 39e2f35bc10f4047b1ea77f79559807d |
+-------------+--------------------------------------+
[root@box01 ~(keystone_nuage)]# openstack security group rule create --proto tcp --dst-port 8443 vsd
+-----------------+--------------------------------------+
| Field | Value |
+-----------------+--------------------------------------+
| group | {} |
| id | 5a82cacf-b846-4307-a059-7640154ff24b |
| ip_protocol | tcp |
| ip_range | 0.0.0.0/0 |
| parent_group_id | 7ff1256c-aeec-4dac-9cf8-ff6ae9c7ab04 |
| port_range | 8443:8443 |
+-----------------+--------------------------------------+
[root@box01 ~(keystone_nuage)]# openstack server add security group vsd01 vsd
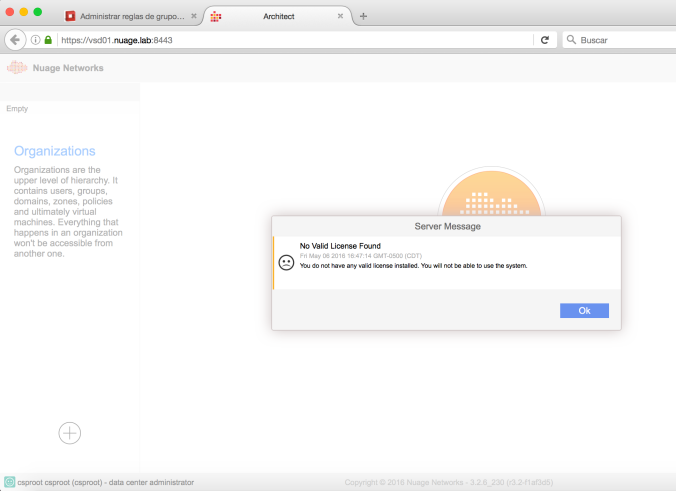
It’s time to access your VSD server. use cpsroot/cpsroot credentials.
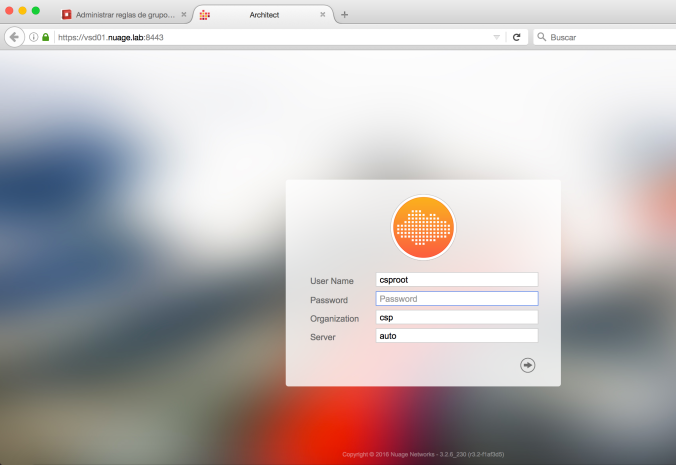
You’ll need a license. comment this post to figure it out that.
VSC: Installing SDN Controller
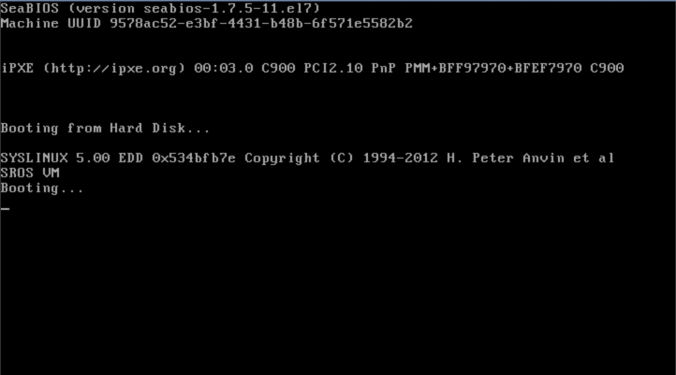
First of all, you will have to change the qcow2 image. please check my post: NUAGE VSC – MODIFY QCOW2 IMAGES WITH GUESTFISH
This is what will you have on your console if everything was ok (Don’t get confuse is you see the screen stuck at the booting… state)
Ping from vsd01 to your brand new VSC (vsc01 / 192.168.101.5) to check your installation as following
[root@vsd01 ~]# ping 192.168.101.5
PING 192.168.101.5 (192.168.101.5) 56(84) bytes of data.
64 bytes from 192.168.101.5: icmp_seq=1 ttl=64 time=2.70 ms
64 bytes from 192.168.101.5: icmp_seq=2 ttl=64 time=0.621 ms
^C
--- 192.168.101.5 ping statistics ---
2 packets transmitted, 2 received, 0% packet loss, time 1244ms
rtt min/avg/max/mdev = 0.621/1.661/2.702/1.041 ms
[root@vsd01 ~]# ssh admin@192.168.101.5
The authenticity of host '192.168.101.5 (192.168.101.5)' can't be established.
RSA key fingerprint is 47:e6:d6:33:9f:d7:cb:fa:ab:83:89:28:28:02:8c:56.
Are you sure you want to continue connecting (yes/no)? yes
Warning: Permanently added '192.168.101.5' (RSA) to the list of known hosts.
TiMOS-DC-C-3.2.6-228 cpm/i386 NUAGE VSC Copyright (c) 2000-2016 Alcatel-Lucent.
All rights reserved. All use subject to applicable license agreements.
Built on Tue Jan 26 21:42:10 PST 2016 [d6274a] by builder in /rel3.2-DC/b1/6-228/panos/main

admin@192.168.101.5's password:

A:vm1#
A:vm1#
A:vm1#
A:vm1#
A:vm1# show bof
===============================================================================
BOF (Memory)
===============================================================================
primary-image cf1:\timos\cpm.tim
primary-config cf1:\config.cfg
ip-address-dhcp
address 192.168.101.5/24 active
primary-dns 192.168.101.3
dns-domain openstacklocal
autonegotiate
duplex full
speed 100
wait 3
persist off
no li-local-save
no li-separate
console-speed 115200
===============================================================================
A:vm1#
We’ll add a route and our domain to bof.cfg file
A:vm1# bof
A:vm1>bof# dns-domain nuage.lab
*A:vm1>bof# static-route 0.0.0.0/1 next-hop 192.168.101.1
*A:vm1>bof# save
Writing BOF to cf1:/bof.cfg ... OK
Completed.
A:vm1>bof# exit
A:vm1# show bof
===============================================================================
BOF (Memory)
===============================================================================
primary-image cf1:\timos\cpm.tim
primary-config cf1:\config.cfg
ip-address-dhcp
address 192.168.101.5/24 active
primary-dns 192.168.101.3
dns-domain nuage.lab
static-route 0.0.0.0/1 next-hop 192.168.101.1
autonegotiate
duplex full
speed 100
wait 3
persist off
no li-local-save
no li-separate
console-speed 115200
===============================================================================
Now, we’ll configure NTP and time zone.
A:vm1# configure system
A:vm1>config>system# name vsd01
*A:vsd01>config>system# snmp
*A:vsd01>config>system>snmp# exit
*A:vsd01>config>system# time
*A:vsd01>config>system>time# ntp
*A:vsd01>config>system>time>ntp# server 192.168.101.3
*A:vsd01>config>system>time>ntp# no shutdown
*A:vsd01>config>system>time>ntp# exit
*A:vsd01>config>system>time# sntp
*A:vsd01>config>system>time>sntp# shutdown
*A:vsd01>config>system>time>sntp# exit
*A:vsd01>config>system>time# dst-zone
*A:vsd01>config>system>time# dst-zone CST
*A:vsd01>config>system>time>dst-zone# start second sunday march 02:00
*A:vsd01>config>system>time>dst-zone# end first sunday november 02:00
*A:vsd01>config>system>time>dst-zone# exit
*A:vsd01>config>system>time# zone CST
*A:vsd01>config>system>time# exit
*A:vsd01>config>system# thresholds
*A:vsd01>config>system>thresholds# rmon
*A:vsd01>config>system>thresh>rmon# exit
*A:vsd01>config>system>thresholds# exit
*A:vsd01>config>system# exit
*A:vsd01#
Before save our configuration, we’ll set vsd connection thru xmpp as following:
*A:vsd01#
*A:vsd01# exit all
*A:vsd01# configure vswitch-controller
*A:vsd01>config>vswitch-controller# xmpp-server vsd01:password@vsd01.nuage.lab
*A:vsd01>config>vswitch-controller# open-flow
*A:vsd01>config>vswitch-controller>open-flow# exit
*A:vsd01>config>vswitch-controller# xmpp
*A:vsd01>config>v-switch-controller>xmpp# exit
*A:vsd01>config>vswitch-controller# ovsdb
*A:vsd01>config>vswitch-controller>ovsdb# exit
*A:vsd01>config>vswitch-controller# exit
*A:vsd01#
*A:vsd01# admin save
Now, let’s see if everything is ok and your VSC is connected to your VSD
A:vsd01# show vswitch-controller vsd detail

===============================================================================
VSD Server Table
===============================================================================
VSD User Name : cna@vsd01.nuage.lab/nuage
Uptime : 0d 02:31:27
Status : available
Nuage Msg Tx. : 8 Nuage Msg Rx. : 8
Nuage Msg Ack. Rx. : 8 Nuage Msg Error : 0
Nuage Msg TimedOut : 0 Nuage Msg MinRtt : 50
Nuage Msg MaxRtt : 60

===============================================================================
Ok guys, next post we’ll install our plugin into a brand new openstack installation
See you around!

Hello pinrojas,
I am very glad to come across your blog about nuage/openstack. I have a lot of hands-on experience with ALU/Nokia router, and want to build a homelab to practice their Nuage SDN solutions.
I have experience firing up openstack instances, but your demo above is too advanced for me. I can hardly put the pieces together.
Could you kindly assist me to get a Nuage openstack lab running on my home servers?
One more thing, how do i get license for the nuage components.
Thanks to respond as soon as possible.
Regards,
Stephen
Glad you like it. reach me out on my twitter @pinrojas and let’s follow this talking up there (direct message)
BIND files that should work on a CentOS 7 for a domain mypoc.lab in a 192.168.100.0/24 network … 😀
/etc/named/named.conf.local
======================================
zone “mypoc.lab” {
type master;
file “/etc/named/zones/db.mypoc.lab”; # zone file path
};
zone “100.168.192.in-addr.arpa” {
type master;
file “/etc/named/zones/db.100.168.192”; # 192.168.100.24 subnet
};
======================================
/etc/named/zones/db.mypoc.lab
======================================
$TTL 604800
@ IN SOA ntp.mypoc.lab. admin.mypoc.lab (
3 ; Serial
604800 ; Refresh
86400 ; Retry
2419200 ; Expire
604800 ) ; Negative Cache TTL
;
; name servers – NS records
mypoc.lab. IN NS ntp.mypoc.lab.
; name servers – A records
ntp.mypoc.lab. IN A 192.168.100.101
; 192.168.100.0/16 – A records
vsd01.mypoc.lab. IN A 192.168.100.220
xmpp IN CNAME vsd01
vsc01.mypoc.lab. IN A 192.168.100.221
vsc02.mypoc.lab. IN A 192.168.100.222
esx01.mypoc.lab. IN A 192.168.100.225
esx02.mypoc.lab. IN A 192.168.100.226
esx03.mypoc.lab. IN A 192.168.100.227
osc01.mypoc.lab. IN A 192.168.100.230
nova01.mypoc.lab. IN A 192.168.100.231
nova02.mypoc.lab. IN A 192.168.100.232
nova02.mypoc.lab. IN A 192.168.100.233
; SRV records
_xmpp-client._tcp IN SRV 10 0 5222 vsd01.mypoc.lab.
======================================
/etc/named/zones/db.100.168.192
======================================
$TTL 604800
@ IN SOA ntp.mypoc.lab. admin.mypoc.lab. (
3 ; Serial
604800 ; Refresh
86400 ; Retry
2419200 ; Expire
604800 ) ; Negative Cache TTL
; name servers
@ IN NS ntp.mypoc.lab.
; PTR Records
101 IN PTR ntp.mypoc.lab.
220 IN PTR vsd01.mypoc.lab.
221 IN PTR vsc01.mypoc.lab.
222 IN PTR vsc02.mypoc.lab.
225 IN PTR esx01.mypoc.lab.
226 IN PTR esx02.mypoc.lab.
227 IN PTR esx03.mypoc.lab.
230 IN PTR osc01.mypoc.lab.
231 IN PTR nova01.mypoc.lab.
232 IN PTR nova02.mypoc.lab.
233 IN PTR nova03.mypoc.lab.
======================================
Thanks DINKO I’ve got some feedback that some of my bind files are not working so smoothly. Thanks again for the contribution.
Thanks Dinko, I will load this, test and give a feedback.
Thanks a million.
Cheers!!!
@DINKO; Mauricio,
Does it mean /etc/named.conf will be left with default. and no modifications?
@DINKO,
Please share your /etc/named.conf details.
I would like to compare it with mine.
Regards.
When installing v5.4.1 with Queens+Centos7.6, I encounter very slow performance for the VM and always fail when installing the VSD.
It turns out I need to set/change the virt type to kvm and host passthrough on the nova config.
Thanks for the info